

Getting started as an Author or Editor
To get started, we'll walk you through the following steps:
General knowledge
What is launchpad?
Launchpad is the software collaboration platform that our project uses for code hosting through Bazaar, translations, bug tracking etc.
What is Bazaar (bzr)?
Bazaar is a distributed version control system that makes it easier for people to work together on software projects.
What is bazaar branch?
A branch is the record of all the commits that have been done by project’s contributors.
The Big Picture
What does the author/editor team do?
The editor in chief leads the author/editor teams and assigns chapters to authors and editors according to their interest and their expertise. Once the team is organized, its goals are set and a writing freeze date is established, authors start working on their chapters while editors proofread in parallel. Throughout the authoring process, authors, editors, and the editor in chief are in contact with each other so they can deal with problems together, achieve a consistent style and voice throughout the book, and ensure the best long-term result. By the writing freeze date, the team should have finished the writing of the manual. Then the new manual release gets published!
How the work is done?
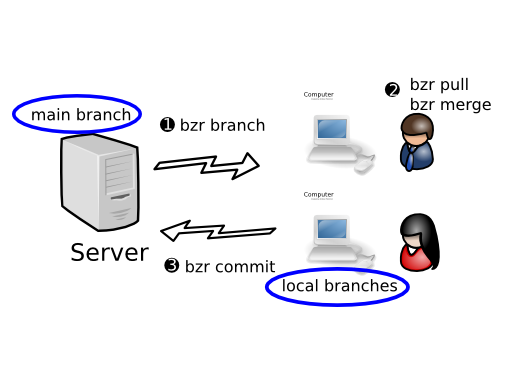
When we begin work on a new manual release, we create a branch. The branch contains all the files needed by the authors and contributors. Every author or group of authors is working on their own section or chapter and they are responsible for writing new material or modify the existing content. Each file is saved as a LaTeX file with the extension .tex (i.e., filename.tex). When the author modifies the file(s) and wants to share the changes with others, he/she commits the LaTeX file(s) to the branch. Other contributors pull or download the latest branch revision containing the newly modified files.
The following picture illustrates the process:
You have two ways to work with branches either with commands or though a GUI application (e.g Ground Control, Bazaar Explorer).
Creating a Launchpad Account
- Go to https://launchpad.net and click "Register" in the top-right corner of the page
- Fill in your details
Now you need to create an SSH key. Instructions taken from here.
- Install OpenSSH. On Ubuntu, you can install OpenSSH by opening your terminal and typing:
- Once OpenSSH is installed, stay in the terminal and type:
- When prompted, press Enter to accept the default file name for your key.
- Next, enter then confirm a password to protect your SSH key. Your key pair is stored in ~/.ssh/ as id_rsa.pub (public key) and id_rsa (private key)
$ sudo apt-get install openssh-client
$ ssh-keygen -t rsa
- Visit your SSH keys page.
- Paste your public key into the text box and then click the Import public key button to continue.
Now you need to upload the public portion of your SSH key to Launchpad:
Open your public key in a text editor and copy its contents to your clipboard. The public key file has the extension .pub. For example: id_rsa.pub
Joining our team
- Go here.
- Click on "Join this team."
- You should subscribe to the mailing list as well.
Downloading the bzr branch
You will need to install bzr. Run these commands in a terminal to install bzr and configure it.
- Install bzr:
- Configure bzr with your name and email:
- Create a new directory in your home folder called Projects.
- Change into that directory in a terminal window:
- Once you are in your Projects directory, run this command to download our branch:
- Bzr will now download the project files. This may take a few minutes depending on your connection speed.
$ sudo apt-get install bzr
$ bzr whoami "Your name <email@domain.com>"To check that bzr knows who you are, run:
$ bzr whoamiIf it has worked, it should return your name and email address. Now we need to download the Ubuntu Manual branch.
$ mkdir ~/Projects
$ cd ~/Projects
$ bzr branch lp:ubuntu-manual ubuntu-manual-trusty
Installing TeX Live
The Ubuntu Manual requires TeX Live. The version of TeX Live in the Ubuntu repositories is incomplete and out-dated. You must use the upstream version of TeX Live to compile the manual successfully.
Installing TeX Live
- First, remove any Ubuntu TeX Live packages, if you have them installed.
$ sudo apt-get remove texlive-*
- Download the TeX Live install script: Download now
- Unpack the tarball:
$ tar xvf install-tl-unx.tar.gz
- Change to the newly-unpacked directory:
$ cd install-tl-*
- Run the script:
$ sudo ./install-tl
- Select where you’d like to install everything, and any other options you prefer. If you choose not to install everything, the minimum that you’ll need is the following collections:
- Essential programs and files (a)
- LaTeX recommended packages (s)
- XeTeX packages (C)
- From the main TeX Live installation menu select Options (O).
- From the Options menu, select “create symlinks in standard directories” (L).
- The default directories are usually okay.
- Press R to return the main menu.
- Run the install-pkgs.sh script that’s in the ubuntu-manual-version/pkgs/ directory to make sure you have all the required packages.
$ ~/Projects/ubuntu-manual-trusty/pkgs/install-pkgs.sh
- If everything checks out okay, you should be able to run: make ubuntu-manual-LANG.pdf where LANG is the language code (see the po/ directory for a list of supported languages).
- If everything checks out okay, you can build the PDF:
$ cd ~/Projects/ubuntu-manual-version   # e.g., ~/Projects/ubuntu-manual-trusty
$ make
This will generate the file ubuntu-manual.pdf, which is the English manual in PDF format. To make the manual in another language use the following command:
$ make ubuntu-manual-LANG.pdf
where LANG is the language code. (See the po/ directory for a list of supported languages.) This requires a .po file (e.g., nl.po) in the given language in the subdirectory po/.
Under the language collections, you can skip all the documentation, but be sure to install all the languages you wish to translate into. (If the language you wish to translate into isn’t listed in the menu, don’t worry, there are just no specific packages required for that language.)
You should also enable the creation of the symlinks:
Once those are installed, we can install the remainder of the packages with the install-pkgs.sh script. (Note that this hasn’t been tested yet and it’s pure guesswork on Kevin’s part! Let us know if it does or doesn’t work for you.)
Checking Prerequisites
To make sure you have all the prerequisites installed, run the install-pkgs.sh script (located in the ubuntu-manual/pkgs/ directory).
The script will check for the required Ubuntu packages, TeX packages, and fonts.
Start working with the TeX files
The first priority for authors is to write the content of the manual, but the manual isn't just a simple PDF. Authors should use LaTeX language to mark up the text. You don't have to learn the whole language to do your job as an author; there are specific tags that are used. Our style guide (PDF) should teach you all you need to know about LaTeX.
If you have trouble using LaTeX, it's okay. An editor will do the mark up of your files.
Compiling the manual
By compiling the manual you will find any syntax errors in the LaTeX markup. You can fix the errors and review your work more easily. It isn't necessary for authors to compile the manual, but we encourage you to do so in order to be able to fix any possible errors and see what your work looks like.
To compile the manual go to the ubuntu-manual/ directory and run make.
Sharing your work with the team
As was mentioned at the beginning, you may use either GUI applications or terminal commands when you want to work with bzr branches. Here is a list of some cool GUI applications.
Commands
Open up a new Terminal and change the working directory to the location of the branch.
Add the files to bzr:
$ bzr add
That should add all files in your working directory to bzr.
Now you need to see the differences (there will be none if you have got the branch for the first time):
$ bzr diff
Then commit it:
$ bzr commit -m "What you've changed"
So for example:
$ bzr commit -m "Fixed some spelling mistakes in chapter 6"
After it has said "committed revision X" you should be able to push it through to main:
$ bzr push lp:ubuntu-manual
Now go to Launchpad and check that it has indeed been pushed up to the next revision.
Updating your local branch
Run the following command to "pull" the latest branch from Launchpad and merge it with yours:
$ bzr pull lp:ubuntu-manual
Remember all bzr commands must be in the root directory of ubuntu-manual, where your branch is registered.
If you have created a new folder or new files (ie, not edited an existing one) then you will need to run
$ bzr add
again to add these new files/folders to the bzr branch, then you'll need to run bzr diff to check they've been added, and then the commit line shown above. Then finally push it through, once you've made sure no one else has pushed through something in the few minutes since you last checked!
How to make changes the RIGHT way
Firstly, make sure you have the latest revision by going here:
- Run bzr diff when you've got the latest revision, to see what changes someone else has made
- Make your own changes
- Run make clean to get rid of all the unnecessary build packages
- Run bzr diff again to confirm them
- Commit them with a good description. Not word-for-word changes, but specific enough for someone to easily find again
- Push them through to main, and then check the Launchpad page to see it's gone up to the next revision.
Help us improve
Thank you for your interest. Please help us improve this page so we can help more the new authors and editors. Send us an email with your critiques, impressions, recommendations, etc. to our mailing list.